 Forward mandible area
From this angle you can clearly see the distinctive "mandibles." These differ from the YT-1300 (Millenium Falcon) but not enough that we could not alter a YT-1300 into a perfect YT-2000. The biggest challenge was not the mandibles, but the design and placement of fthe new cockpit, which extends beyond the main hull.
Forward mandible area
From this angle you can clearly see the distinctive "mandibles." These differ from the YT-1300 (Millenium Falcon) but not enough that we could not alter a YT-1300 into a perfect YT-2000. The biggest challenge was not the mandibles, but the design and placement of fthe new cockpit, which extends beyond the main hull. |
|
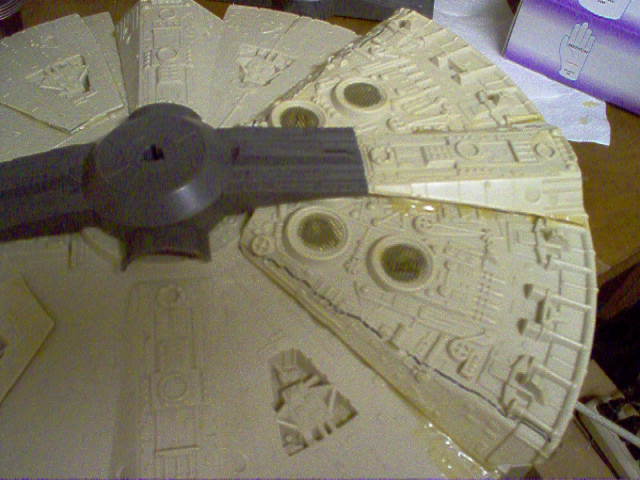
Project takes shape
From the beginning it was important to accept that our custom CEC YT-2000 would be different than the stock model I have renderings of. This is due to the restrictions of the YT-1300's (Falcon's) hull size and shape. While it is a very similar design that lends itself to the YT-2000, the YT-1300 hull is not close enough for us to duplicate a YT-2000 EXACTLY. For one thing it is not long enough, and the mandibles are too close together to accept a large cockpit to be mounted between them. You might call my ship the YT-2000A. In the Star Wars scheme of things, we want our ship to have been purchased by the Rebel Alliance, so the finished ship will bear those markings on its freshly-painted hull.
Here, I have made patterns, marked, cut, trimmed, and redisigned the mandible area. The inside texture pieces were made from a mold I made of the edging, then cast in poly resin and trimmed to fit. Then fitted with a Dremel and glued into place.
Budget for this project excluding tools is about .00 so far.
|
|
How difficult can it be?
Presently, I am modifying a 1979 Millenium Falcon, which is going along quite well so far.
Actually the plan I came up with uses two old Millenium Falcon hulls (YT-1300's). You can get these on EBAY for as low as .00 each. It seems that no one wants these old, incomplete hulls, and there is no apparent shortage of them out there.
Anyway, using a Stanley 15-809 hand saw, carefully cut the entire Falcon cockpit tube from both top and bottom hull sections of one of the YT-1300's. You could also use a Dremel with a cut off wheel. Make the cuts where the tube meets the main hull. This will leave a gaping hole there. You will cover this hole with a pie-shaped piece you need to cut from the top portion of second ship's hull large enough to cover. Sand the edges, clean both surfaces, and attach with epoxy glue (2-part, NO SUPERGLUE).
Next, trace the shape of the YT-2000's "mandibles" onto the existing ones (the YT-1300's are straight, and too narrow to accept a cockpit between them) and cut away the opening all the way to, and across the back. Using various cut sections from the scrap ship, use this material to glue to the inside of the new "mandibles". Trim the inside of the mandibles with the edge strips from the second ship.
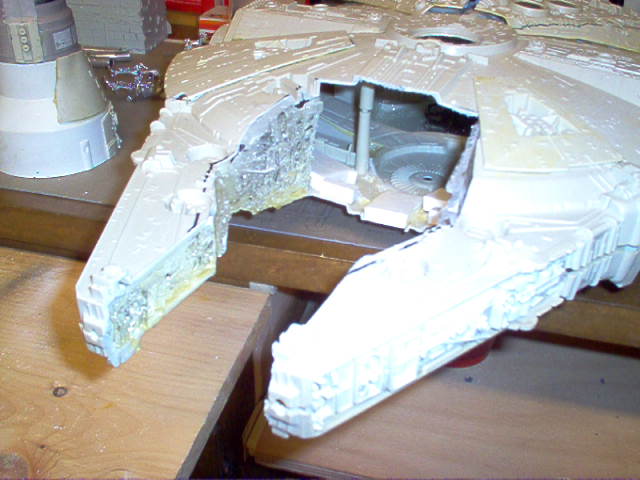
Across the back portion where the cockpit mounts to the hull, you will need to install a larger piece of hull from the scrap ship. Then it is time to make and install the cockpit.
The cockpit I chose to use is one that I cut from an Outrider, or YT-2400. Seperate it from its mount by cutting with the hand saw or a jigsaw with a metal-cutting, fine blade. Sand the cut area smooth. Next, Use a 3" x 2" PVC adapter ( a piece of PVC pipe that is 3" on one end, 2" on the other, kind of looks like a funnel--cost .00) And fit the 2" end to the back end of the cockpit. This will require some fitting and trimming with a Dremel. Epoxy those together overnight.
Next attach the 3" portion of the assembly to the main hull between the "mandibles" and the main features of the ship are complete. There are a lot of other features one could add, including a hull extension. The YT-2000's hull has a bowl-shaped peak on top where the quad gun is at on the YT-1300. I used hull parts from the Outrider to do this.
The new cockpit tube/assy made the ship front heavy so I have counterbalanced it with poured resin and old nuts and bolts in the bottom of the hull. Here you see the whole ship, which is ready for some detail and final fitting work. Then will come the paint.
.
Here you'll create or edit a custom page for your Web site.
For additional pictures or questions, please contact me.
.
|
 Fist look at the YT-2000!
Not finished yet....this one still needs some work in several areas and then paint.
Fist look at the YT-2000!
Not finished yet....this one still needs some work in several areas and then paint. |